FR
FR  EN
EN  IT
IT  ES
ES  DE
DE 
How Commercial LCD Displays Are Made: Inside the Manufacturing Process
Quick Answer:Commercial LCD displays go through eight manufacturing stages. The difference between a display that lasts 5+ years and one that fails in 18 months is visible at each stage—if you know what to look for.
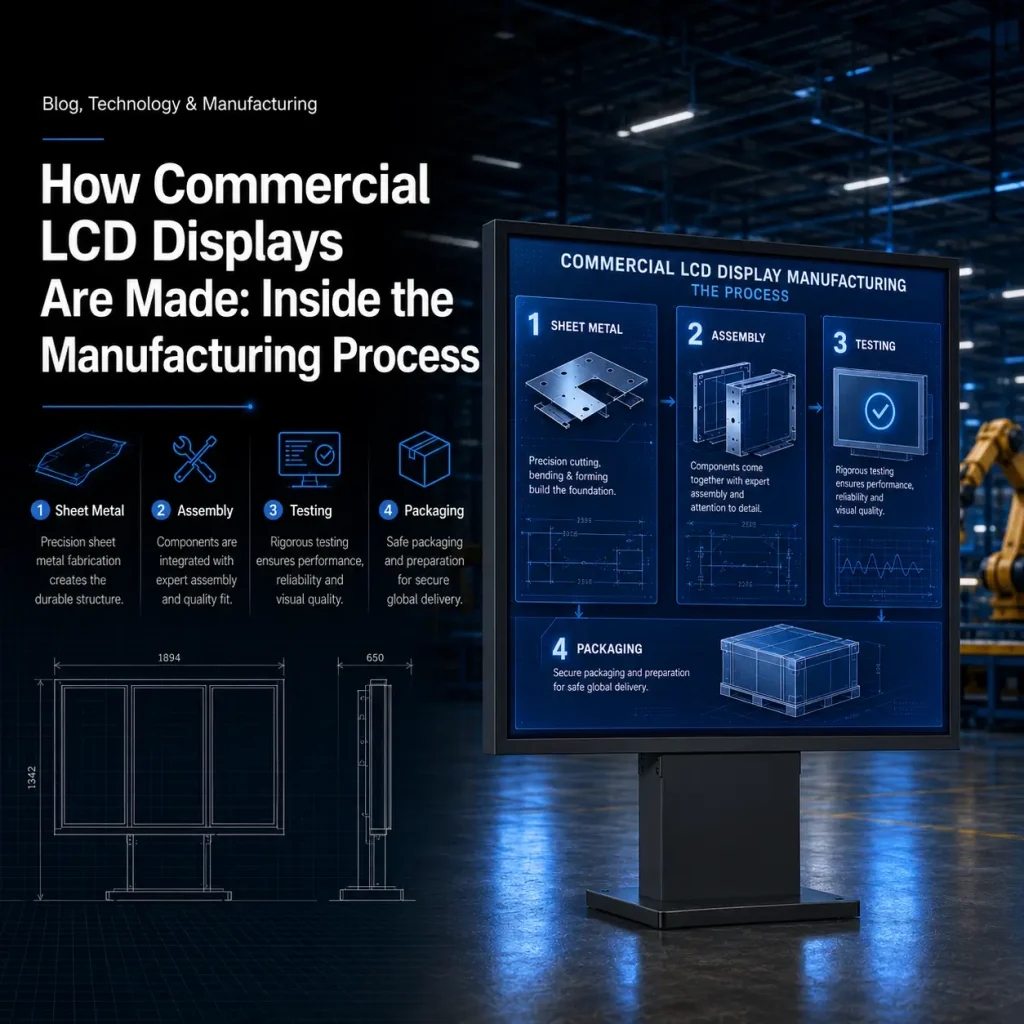
The 8 critical stages: 1. Panel Selection: A or A+ grade only (vs. A- or B for consumer TVs). Brightness binning for consistency. 2. Optical Bonding: Fills the air gap with optically clear adhesive. Reduces light loss from 15% to under 1%, eliminates internal condensation. 3. Backlight Assembly: High-density LED arrays (2× the LEDs of consumer displays) with precision diffusers. 4. Driver Board & Controller: Industrial-grade components rated for 24/7 at 0°C–60°C (consumer boards are not). 5. Enclosure & Housing: Metal/aluminum with IP-rated sealing (vs. plastic in consumer products). 6. Assembly & Integration: ESD-protected workstations with visual SOPs. 7. QC & Testing: 100% final QC, 24–48 hour aging test, brightness/luminance verification. 8. Packaging & Shipping: Export-grade double-wall cartons with EPE foam.
Four questions every buyer must ask: Does the supplier disclose panel grade? Is optical bonding done in-house? what’s the aging test duration (minimum 24 hours)? Is final QC 100% or sample-based?
Definition: Optical bonding is a manufacturing process that fills the air gap between a display’s cover glass and LCD panel with an optically clear adhesive (LOCA liquid or OCA film). For example, it eliminates internal reflections and condensation, improves sunlight readability by up to 400%, and protects the LCD panel from vibration damage.
Introduction: Why Understanding Manufacturing Helps You Choose Better Suppliers
Most B2B buyers evaluate commercial displays by looking at specifications, price, and certifications. But these surface-level metrics only tell part of the story. The real quality, reliability, and longevity of a commercial display are determined by what happens inside the factory –the manufacturing processes, material choices, and quality control systems that transform raw components into finished products.
Understanding the LCD display manufacturing process gives you three critical advantages as a buyer:
1. You can ask better questions during supplier evaluation –moving beyond spec sheets to probe the processes that determine real-world performance
2. You can identify quality shortcuts that suppliers take. To reduce costs –and understand the trade-offs you are making when you choose a cheaper option
3. You can predict long-term reliability based on how a display was manufactured, not just how it performs on day one
Au MWE (Marvel Technology), we have spent 18+ years manufacturing commercial displays in Shenzhen, China, serving clients across 150+ countries. Take this article takes you through every stage of the. Commercial LCD display manufacturing process from panel selection to final packaging, with insights on what each stage means for display quality.
Table of Contents
1. Overview of LCD Display Manufacturing
2. Stage 1: Panel Selection & Testing
4. Stage 3: Backlight Assembly
5. Stage 4: Driver Board & Controller
6. Stage 5: Enclosure & Housing
7. Stage 6: Assembly & Integration
8. Stage 7: Quality Control & Testing
9. Stage 8: Packaging & Shipping
10. What This Means for Buyers
12. Conclusion
Overview of LCD Display Manufacturing
The manufacturing of a commercial LCD display is a multi-stage process that transforms a raw LCD panel into a finished, deployable product. Unlike consumer displays (TVs, monitors) which are mass-produced on highly automated lines, commercial displays require more manual processes. Custom engineering rigorous testing because they must operate in harsher environments for longer periods.
From Glass to Finished Product
The journey from raw materials to finished display involves eight major stages:
1. Panel Selection & Testing –choosing and grading the LCD panel
2. Consider Collage optique –bonding glass to panel for outdoor readability
3. In practice, Backlight Assembly –installing and calibrating the LED backlight system
4. Typically, Driver Board & Controller –assembling the electronics that drive the panel
5. As an illustration, Enclosure & Housing –fabricating the metal or aluminum enclosure
6. One example: Assembly & Integration –combining all components into a finished unit
7. Quality Control & Testing –rigorous testing under real-world conditions
8. Packaging & Shipping –protective packaging for global logistics
Each stage involves specialized equipment, skilled technicians, and quality control checkpoints. Take a failure at any stage compromises the entire product.
Commercial vs. Consumer Manufacturing
| Aspect | Consumer Display | Commercial Display |
|---|---|---|
| Panel grade | A- or B acceptable | A grade only |
| Operating hours | 8–12 hours/day | 16–24 hours/day |
| Lifespan target | 3–5 years | 5–7+ years |
| Luminosité | 250–500 nits | 500–1000 nits |
| Enclosure | Plastic | Metal/aluminum with thermal management |
| Temperature range | 0°C–40°C | -20°C–50°C |
| MTBF | 10,000–20,000 hrs | 30,000–50,000 hrs |
| QC testing | Sample-based | 100% final QC |
| Garantie | 1 an | 3–5 years |
Stage 1: Panel Selection & Testing
The LCD panel is the heart of the display –it determines image quality, brightness, viewing angles, and lifespan. Panel selection is the most consequential stage because no amount of downstream engineering can compensate for a poor panel.
LCD Panel Grades
Not all LCD panels are created equal. Consider panel manufacturers grade their panels based on defect count and severity:
| Grade | Defect Level | Description | Typical Use |
|---|---|---|---|
| A+ (Premium) | Zero defects | Perfect panel, no dead pixels, uniform brightness | Medical, military, premium commercial |
| A (Standard) | 1–3 minor defects | 0–3 dead pixels, minimal brightness variation | Commercial displays (MWE standard) |
| A- (Budget commercial) | 3–5 minor defects | 3–5 dead pixels, slight brightness variation | Budget commercial, indoor signage |
| B (Consumer) | 5+ defects | 5+ dead pixels, visible mura, non-uniform backlight | Consumer TVs, non-critical |
Brightness Bins
Panels from the same production run have varying brightness levels. Panel manufacturers sort panels into brightness bins:
- Bin 1: 350–700 nits (standard indoor)
- Bin 2: 400–800 nits (bright indoor)
- Higher bins: 500+ nits (premium/commercial)
Stage 2: Optical Bonding
Optical bonding is the process of laminating the cover glass to the LCD panel using an optically clear adhesive. Two methods dominate the industry: LOCA (liquid optically clear adhesive) applied as a resin and cured with UV light, and OCA film (optically clear adhesive) laminated under vacuum. The vacuum laminator removes trapped air and ensures uniform adhesive thickness across the panel, which is critical for optical consistency.
A properly bonded display reduces internal reflection from 15% to 1–3%, eliminates condensation between the glass and panel, and improves sunlight readability by up to 400%. For outdoor and high-ambient-light deployments, bonding is not optional—it is the single most important manufacturing step for both readability and long-term reliability.
What buyers should verify: bonding is done in-house with a vacuum laminator (not outsourced), cross-section samples show complete adhesive coverage with no air pockets, and the supplier can provide haze value, transmittance, and adhesion strength test reports.
Optical bonding fills the air gap between the cover glass and LCD panel with an optically clear adhesive (LOCA liquid resin or OCA film). In practice, this eliminates condensation, reduces light reflection from 15% to 1–3%, and improves sunlight readability by up to 400%. For outdoor displays, this is the single most important manufacturing step.
Stage 3: Backlight Assembly
Commercial displays use roughly 2× the number of LEDs in their backlight arrays compared to consumer displays, because higher brightness demands more light output and better uniformity. The backlight assembly includes high-density LED strips, precision diffuser films, brightness enhancement films (BEF), and thermal management systems. Direct-LED backlighting enables local dimming zones for better contrast and power efficiency.
LED binning matters. Suppliers should sort LEDs by brightness and color temperature so the finished screen shows uniform white balance across the entire surface. Mismatched bins produce visible bright or tinted patches that are extremely difficult to fix after assembly.
Thermal management is critical in this stage: LED brightness degrades with heat, and a backlight running hot can lose 10–20% of its output within the first year. Quality manufacturers mount LEDs on aluminum-core PCBs that conduct heat away from the diodes and into the enclosure’s heat sink, keeping the array within its rated operating window.
Stage 4: Driver Board & Controller
The driver board processes input signals and controls the panel. Commercial-grade boards use industrial components rated for continuous 24/7 operation, wider temperature ranges (typically −10°C to 60°C), and higher reliability specifications than consumer boards. The board integrates the SoC/controller, the T-CON (timing controller) that drives the panel, and power management circuitry with solid capacitors and conformal coating to resist humidity and dust.
Key questions for suppliers: Does the board support 24/7 operation without thermal throttling? Which input interfaces are available (HDMI, DP, RS232, IR)? Is firmware field-updatable? Can the board be customized (ODM) for specific interfaces, boot logos, or CMS integrations? A supplier that controls board design in-house can adapt to your requirements; one that only buys off-the-shelf boards cannot.
Stage 5: Enclosure & Housing
Commercial display enclosures are fabricated from aluminum or steel (not plastic), with IP-rated sealing using silicone gaskets. The enclosure has three jobs: protecting the electronics from environmental ingress, managing heat, and defining the product’s service life.
Key construction details to verify: sealed cable entry glands that prevent water ingress where cables exit the enclosure, systèmes de gestion thermique (fans, heat sinks, or active cooling for outdoor units), and powder-coated finishes that resist UV degradation and corrosion. Outdoor enclosures should also include sunshield/hood designs and drainage channels to handle condensation.
IP65 or IP66 ratings indicate dust-tight and water-jet-proof construction. Always confirm the rating applies to the complete assembled unit, not the enclosure alone—a sealed box with unsealed cable entries or an unsealed front bezel will fail in the field regardless of the enclosure’s rating.
Stage 6: Assembly & Integration
Final assembly takes place in ESD-protected (electrostatic discharge) workstations, with visual work instructions (SOPs) posted at each station. The assembly process includes: LCD panel mounting, driver board installation, power supply connection, cable routing and strain relief, IP gasket sealing, and final enclosure closure. Each station is followed by an in-process inspection (IPQC) checkpoint before the unit moves to the next stage.
This is where manufacturing discipline shows: proper torque on fasteners, cable routing kept away from heat sources, and clean handling of optical surfaces. Ask your supplier about their IPQC checkpoints and whether they track assembly defects by station—a supplier that measures defects by process step is one that can actually fix them.
Stage 7: Quality Control & Testing
Final QC is 100%—every unit is tested, not just samples. The aging test (24–48 hours of continuous operation) is the single best predictor of early-life failure: components with latent defects—weak power supplies, marginal driver boards—typically fail within the first 90 days of deployment, and the aging test accelerates that failure window so it is caught in the factory rather than in the field. A manufacturer that skips or shortens this test is quietly delivering higher field failure rates.
100% of commercial displays undergo final QC testing, not just sample testing. Tests include:
- Power-on test: Display must power on and respond to all inputs
- Display performance: Brightness measured with luminance meter against spec; color uniformity checked; contrast ratio verified
- Touch accuracy (interactive models): 100% tested using a touch testing jig
- Aging test: 24–48 hours of continuous operation under accelerated conditions to catch early-life failures
- IP rating test: Water spray or dust chamber –sample testing for outdoor models
- Vibration/drop test: Sample testing for shipping validation
Stage 8: Packaging & Shipping
Commercial display packaging uses double-wall corrugated cartons, EPE foam corner protectors, anti-static bubble wrap (for panels), plywood crating (for large/outdoor displays), moisture barrier bags with desiccant, and pallet strapping with edge protectors. Export-grade packaging matters because displays pass through multiple handling points in transit—a single forklift impact or moisture event can destroy a unit that passed QC.
Quality suppliers perform drop and vibration tests on packaged units to validate the packaging design, and mark cartons with handling symbols and serial numbers for traceability. For large outdoor displays and ocean freight, ask whether the supplier uses plywood crates with shock indicators—the industry standard for protecting high-value shipments.
What This Means for Buyers
Understanding the manufacturing process enables you to evaluate suppliers more effectively. Here are the key questions to ask:
Questions to Ask Your Display Supplier
1. Typically, What panel grade do you use? –Expect “A” or “A+” for commercial displays.
2. As an illustration, Do you perform optical bonding in-house? –If outsourced, ask about QC handoff procedures.
3. One example: How long is your aging test? –Minimum 24 hours; 48–72 hours is preferred.
4. Is final QC 100% or sample-based? –100% testing is the standard for quality manufacturers.
5. Take Do you have documented SOPs at each workstation? –Visual instructions indicate process control.
6. Consider What is your typical defect rate? –Below 1% is excellent; 1–3% is acceptable.
7. In practice, Can you provide test reports from your QC process? –Genuine manufacturers maintain records.
Numéro de modèle : MWE662 Bandeau taxi double face extérieur P2 P0.4 écran LCD haute luminosité - Marvel Technology (China) Co., Ltd
Q1: How long does it take to manufacture a commercial display?
Standard models: 7–15 days from order to completion. Typically, customized (OEM/ODM) orders: 25–45 days depending on complexity. This includes panel sourcing, assembly, aging tests, and packaging.
Q2: What is the biggest quality difference between consumer and commercial displays?
Panel grade and component durability.Commercial displays use A-grade panels, industrial-grade driver boards, and metal enclosures designed for 24/7 operation. Consumer TVs, by contrast, use lower-grade panels, consumer electronics, and plastic enclosures –they are not suitable for commercial applications.
Q3: How can I verify that a supplier is actually doing optical bonding?
Request photos or video of the vacuum laminator in operation during your factory audit or virtual tour. Ask for cross-section samples of bonded displays showing the adhesive layer. Request the optical bonding test report showing haze value, transmittance, and adhesion strength.
Q4: What is the significance of the aging test?
The aging test runs the display continuously for 24–48 hours to identify early-life failures–the period when most electronic failures occur. This test catches defective components (power supplies, driver boards) that would otherwise fail within the first 90 days of deployment. A manufacturer that skips or shortens this test is delivering higher field failure rates.
Q5: Can a consumer TV be used as a commercial display?
Not recommended. As an illustration, consumer TVs lack the industrial-grade components, proper thermal management, IP-rated enclosures, and 24/7 operating capability needed for commercial use. Using consumer TVs in commercial applications will result in shorter lifespan, higher failure rates, and voided warranties.
Conclusion
Understanding the 8-stage commercial LCD display manufacturing process gives you the knowledge to evaluate suppliers beyond surface-level specifications. One example: the key differentiators between quality manufacturers and commodity assemblers are: panel grade selection, in-house optical bonding, 24–48 hour aging tests, 100% final QC, and documented process controls.
MWE (Marvel Technology) follows all 8 stages with rigorous quality standards. we use A-grade panels, perform in-house optical bonding, run 48-hour aging tests, and maintain 100% final QC testing across all 20+ product lines.
After reviewing the manufacturing process, understand your branding options in our OEM vs white label vs brand guide before placing orders.
Related Articles
- Optical Bonding in Outdoor Displays: Why It Matters for Suppliers and Buyers
- Commercial Display Quality Control: Ensuring Consistent Product Quality
- Best LCD Digital Signage Suppliers in China (2026 Guide)
- Guide d'achat de solutions d'affichage numérique extérieur
Points clés à retenir
- Manufacturing transparency signals quality — suppliers that disclose panel grades (A-grade vs. consumer B-grade), in-house optical bonding, and 48-hour aging tests differentiate themselves from commodity assemblers.
- Panel selection is the foundation — A-grade panels with zero-to-minimal defects, wider temperature ranges (0°C–60°C), and 50,000+ hour MTBF are non-negotiable for commercial 24/7 operation.
- In-house processes beat outsourced — manufacturers that control optical bonding, backlight assembly, and QC in-house deliver higher consistency and traceability than those relying on third-party subassembly.
- 100% final QC is the standard — aging tests (minimum 24–48 hours), automated optical inspection, and documented SOPs at each workstation separate quality manufacturers from box-assemblers.
- Ask the right questions — request panel grade certification, verify in-house bonding capability, confirm aging test duration, and demand 100% final QC reports to validate what a supplier claims.
Tour Our Factory or Request a Manufacturing Assessment
See how a commercial display is built — from panel sourcing to 24–48 hour aging tests. We welcome OEM/ODM partners and buyers evaluating suppliers.